GitHub in RStudio
Using Git in RStudio
Part 1: Create a new RStudio project with Git
There are three ways to create version control for a RStudio project.
a) Create a new project and create a local Git repository: Select File > New Project.., create a project from a New Directory and check the option Create a git repository. In order to push to a remote repository later on you add that remote repository by using the Git shell. If you already know which online repository you want to use for your projects, option c) is more convenient.
b) Create a new project from a folder under version control: In this case you only need to create a new RStudio project for that directory and version control is automatically enabled. Go to File > New Project, select create a new project from an Existing Directory and create the project.
c) Create a new project based on a remote Git repository: Select File > New Project.. and from the opening menu select to create a new project from Version Control, Choose Git, then provide the repository url (use the https link of the url if you want to avoid all the ssh trouble) from the the repository you want to clone and create the project.
In this tutorial we create a project based on a remote GitHub repository (option c). Hence we first create a new repository on GitHub and create our GitHub project from that repository.
1. Create a new GitHub repository: Login to your GitHub account and create a new GitHub repository. Give your new repository a short and memorable name e.g. rstudio-git-test, check the option to initialize this repository with a README and create the repository.
2. Copy the repository HTTPS url: To create a new Git based project in RStudio, we need the repository url. You find the repository HTTPS url on the just created GitHub project page. There press the button <> Code (green button) and copy the HTTPS link of the project by clicking the little icon to the right of the URL. The link will be something like https://github.com/yourusername/rstudio-git-test.git.
3. Create a new RStudio project with Git version control: Now everything is ready to create a new project with Git version control in RStudio. In RStudio Select File > New Project.., select Version Control, Choose Git, then provide the repository HTTPS link, select the R workspace folder and create the project. RStudio now copies (clone in Git terms) the content of the repository to your project folder. The content of the GitHub repository should now appear in the Files pane of RStudio and you should see there the created README.md.
Part 2: Make local changes, commit and push to GitHub
1. Make local changes: Open the README.md file and edit and save the file.
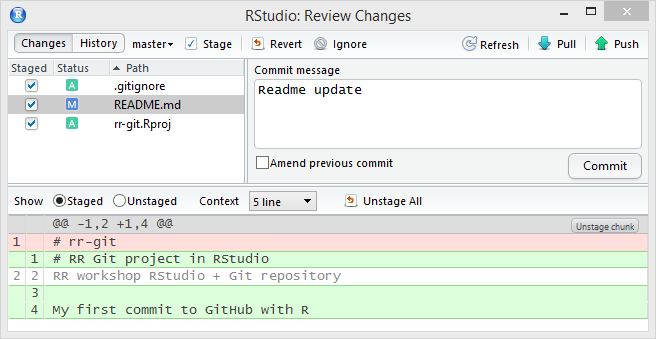
# RR project in RStudio

RR workshop RStudio + Git repository

My first commit to GitHub with R
2. Commit the changes: Now we commit the local changes to the local Git repository.
In RStudio press the Git icon and select Commit from Git menu (Ctrl+Alt+M) to open the commit window to review the changes in the repository. In the Staged column we select by checking the checkbox the files we want to commit. The lower pane shows the edits in green and red of the file. Enter a commit message to indicate what has changed in this commit e.g.Readme update and press the Commit button.
3. Push to the remote repository: To push the changes to the remote GitHub repository press the Push button on the upper right corner of the commit window. You will be prompted to enter the username and password of your GitHub account. Enter them and check on the GitHub page if the changes got pushed to your online repository on GitHub.